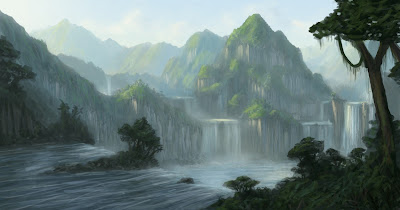
In this tutorial I will take you from initial concept painting, to final mattepainting, then 3D camera projection of the final shot.


Step 1 - Planning
Think about what type environment you’d like to create and get some inspiration.
- Look at reference photos of similar environments and lighting conditions.
For this Tutorial we are planning to do a Tropical Jungle and Water fall scene.
Step 2 – Sky
Pick a sky color for the background

Step 3 – Block in Composition
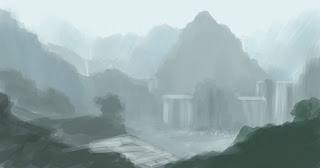
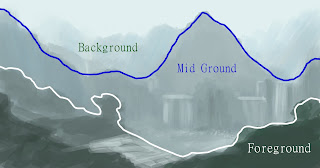
Choose a mid-tone color for your mountains and block in the shapes, remember that as they get further away they become closer to the sky color. The following guidelines will help you create an interesting composition.
2. Choose a focal Point
Your focal point should be:
- Around one of the third lines
- High area of Contrast
- High level of detail

3. Create visual Paths leading to your focal point.

4.


5. Add more Saturation and Contrast


Go in with a small brush and scribble in lots of small details. You can also grab a soft brush to paint in some clouds. Pick the sky color and with a soft brush you can add some mist around the base of the waterfalls.
Final Matte Painting and Projection
Using your concept painting as a guide you can take it to the next level of finished matte painting.
I like to start with the background and work my way forward, but doing it in another order works as well.
Start by gathering all the photos you'll need for your painting.
Here are my favorite sites for photos: Google.com , Smugmug.com , Flickr.com , cgtextures.com
Step1 - Break your concept painting into layers and starting with the sky place your photos in the background.


Work your way forward by moving to the next layer and repeating this process.


Keep doing this until you replace all the layers of your concept painting with photographs.

Step 3 - Plan out your camera move. Depending on how big of a camera move you want, you'll decide how many layers and 3D geometry you need. So import your final painting as an image plane attached to a camera in Maya, and block in 3D geometry to match the landscape of you painting.( I like to use Maya, but any other 3D software or Compositing Program with a 3D camera will work.) Try to keep a realistic scale of objects relative to each other. Then duplicate that camera. Name one "Projection Camera" and the other "Render Camera." Animate the render camera.
Here are some screen shots from my maya scene:


Step 4 - Break up your Photoshop File into layers and save a color and alpha Targa image for each layer.
For this example I only used 4 layers but you can use more for better paralax.


Step 5 - Create a Projection Shader for each layer in Maya.
In maya create a new Surface Shader node and in the color input create a file as a projection.


Create a new Shader for each layer. Once you've done this for every layer, render from your render camera to see the results. Look for any holes in your layers and extend any layers if needed.
Here is the result of my render using only 4 layers:
I hope you've enjoyed this tutorial if you have any questions or comments please feel free to leave them below and I'd be happy to answer them.
Cheers,
Jonah